In brief
- 🧱 Grout is porous, allowing concealed mould to settle within biofilm and limescale. Sprays seldom reach deep enough on their own, so mechanical agitation is needed to disrupt this barrier.
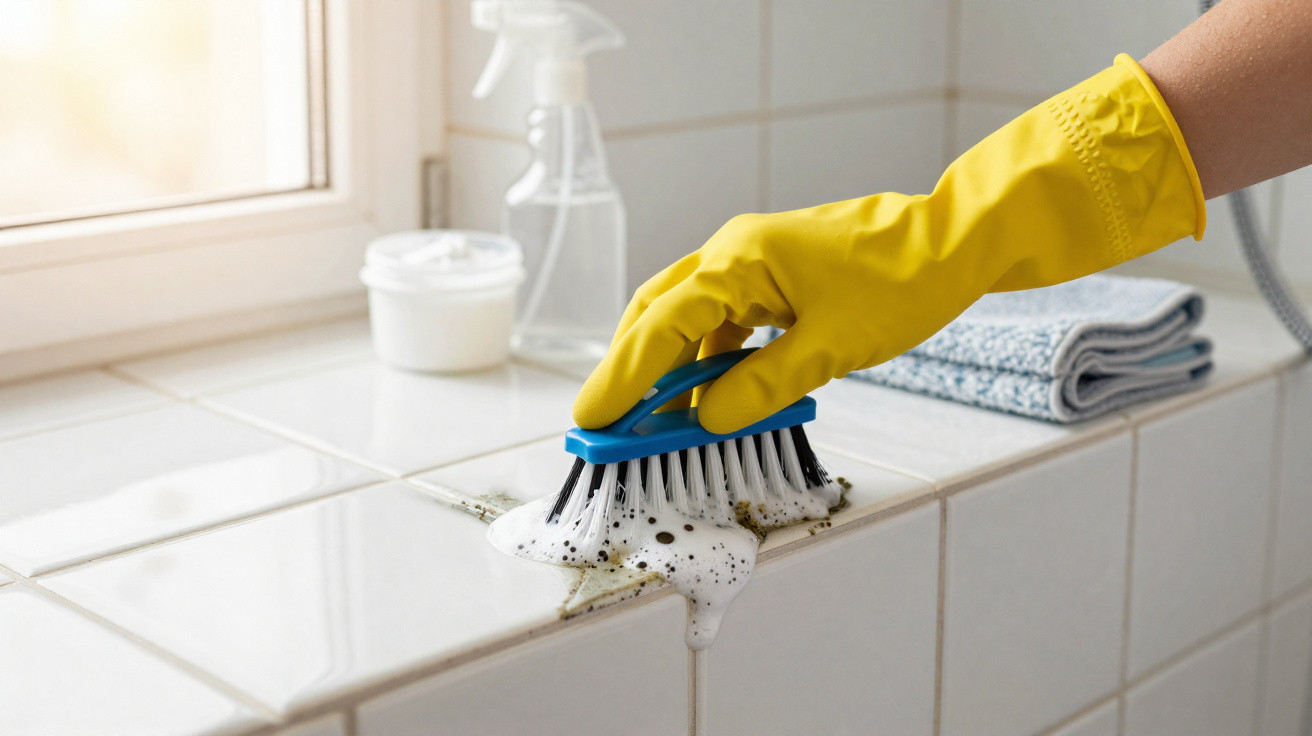
- 🪥 A bath brush applies targeted shear force along curved joints, unlike tools that glide over raised tile surfaces. The most effective pairing is a brush and a mild alkaline cleaner.
- 🧪 For a steady scrub: wet the surface first, spread a bicarbonate + washing-up liquid paste, leave it for 10–15 minutes, scrub the joints using short strokes, then rinse and dry thoroughly.
- 🌬️ Prevention is important: keep the extractor running for 15–20 minutes after showering, use a squeegee and towel, monitor moisture with a hygrometer, and use a breathable grout sealer each year.
- 🧰 Recognise when cleaning will not solve the issue: repeated staining, cracking or leaks require professional regrouting. Do not use strong acids on natural stone, and remember that chemicals without agitation are not a remedy.
A modest change is taking place in UK bathrooms, and it has nothing to do with expensive gadgets or powerful bleach. The unassuming bath brush - a handheld, stiff-bristled tool - combines measured pressure with patient strokes to remove dirt from tile joints. When mould takes hold in grout, spray cleaners may lighten the visible surface while leaving its underlying growth untouched. A technique from a journalist’s notebook, tried in rented properties and family houses, demonstrates that regular, uncomplicated scrubbing can reach the minute pores where fungus takes hold. This guide explains why grout supports hidden mould, why a bath brush creates the necessary force, and how to restore the finish step by step without sacrificing your weekend - or your lungs.
Why Grout Becomes a Home for Hidden Mould
Grout is not a smooth, sealed surface. It is a porous blend of sand and cement, sometimes polymer-modified cement, containing countless tiny channels. Through capillary action, these channels draw in water and retain dampness after a shower, even when the area appears dry. Mould and mildew prosper there beneath a tacky biofilm made from soap deposits, body oils and shampoo polymers. A disinfectant spray may be slowed by this coating, much like clingfilm, before it can penetrate properly. The result is a persistent colony fixed below the surface, unseen until it emerges as grey discolouration or tiny black spots.
Hard water, common across much of the UK, makes the issue worse. Limescale leaves deposits that roughen the grout and create additional points where spores can lodge. Short, hot showers also produce humidity surges, particularly in compact bathrooms with inadequate extraction.
That is why a “spray-and-walk-away” approach so often disappoints. Liquids move swiftly over the tile faces but struggle to reach the hollows, pits and concave joints. Separating biofilm from grout requires mechanical agitation: physical movement that shears away the film and leaves the mould exposed to the cleaning product. Only friction reliably collapses that protective layer, allowing chemistry to finish the job. Grout is rather like carpet pile: when dirt is embedded, vacuuming - the chemical element - cannot replace raking it free with a brush. The aim is to apply controlled force that cleans the joint without damaging the glazed tile.
Why a Bath Brush Is Better Than Gadgets for Deep-Grout Cleaning
Many products claim to transform grout: steam cleaners, rotating scrubbers and strong bleach among them. Each can be useful in particular circumstances, but the bath brush stands out because it provides shear force with precision. A handheld brush gives you control of the angle, pressure and length of each stroke. You can follow the concave joint so that the bristles work into the channel instead of skimming across it.
It also allows you to linger on stubborn marks, work carefully around silicone and maintain contact long enough to remove biofilm. By comparison, rotary heads often travel over the tiles, cleaning the raised areas rather than the recessed joints. Steam introduces additional moisture, which may be counterproductive where grout is cracked or unsealed. For most domestic grout, pressure plus patience outperforms speed plus spectacle.
| Method | Best For | Pros | Cons |
|---|---|---|---|
| Bath brush + mild alkaline paste | Routine deep clean of most grout | Low cost; precise control; minimal fumes | Manual effort; technique matters |
| Electric scrubber | Large, flat expanses of tile | Quick coverage; less fatigue | Can miss concave joints; splatter risk |
| Steam cleaner | Sanitising sealed joints | No chemicals; heat penetrates | Moisture load; not ideal on cracked grout |
| Chlorine bleach rinse | Rapid whitening of light staining | Fast visual boost | Fumes; colour damage; surface-only effect |
| Oxygen bleach soak | Stubborn organic stains | Gentler than chlorine; effective over time | Needs long dwell; rinse thoroughly |
The most reliable results come from combining movement with cleaning chemistry: a gentle mild alkaline paste to saponify oils, followed by brush strokes that break up the film. It is this combination, rather than one supposedly “magic” product, that helps grout regain its original colour. As resistance changes through the handle, you can tell when the slimy layer has been removed and clean grout is beneath it. It’s tactile feedback that gadgets rarely deliver.
The Bath Brush Steady-Scrub Method, Step by Step
Treat a bath brush session like a short workout: technique matters more than excessive force. Begin by ventilating the room, either by opening a window or switching on the extractor, and put on gloves. Wet the grout before applying cleaner so that it does not draw moisture out of the mixture. Make a paste with bicarbonate of soda and a small amount of washing-up liquid. The alkaline bicarbonate helps loosen oils, while the surfactants lift residue. Let it dwell for 10–15 minutes so chemistry softens the film before you scrub.
Next, scrub along each joint with short, overlapping movements. Increase pressure gradually until the brush begins to drag less, indicating that the film has released. Rinse regularly to remove the loosened slurry; otherwise, it will simply be spread to another area.
- Pre-wet tiles and grout, and provide good airflow.
- Spread the mild alkaline paste and allow time for it to dwell.
- Brush along, rather than across, the joint using short, consistent strokes.
- Reapply the paste where required, then rinse and wipe to check progress.
- Complete the task with a clean-water rinse and dry the surface with a microfibre cloth.
During tests in three London bathrooms, including one rented home with joints that had been grey for years, this approach gave the most consistent brightening and left the fewest “missed pits” along the grout lines. The handheld brush was particularly useful in confined corners and helped prevent silicone from being pulled up at the edges.
If hard-water limescale remains, treat small areas with a non-acidic limescale remover that is suitable for grout. Alternatively, use diluted white vinegar only on ceramic or porcelain, keeping it away from natural stone; vinegar and bleach must never be mixed. Drying is the unsung final step: a few minutes with a microfibre towel deprives mould of the moisture it wants most.
Prevention, Advantages and Disadvantages, and When to Contact a Professional
After restoring the grout, manage moisture to preserve the result. Leave the extractor running for 15–20 minutes after showering and keep the door slightly open to encourage airflow. Passing a squeegee over the area and towel-drying the grout lines takes less than two minutes, yet significantly reduces lingering dampness. A small hygrometer can be useful: where humidity remains above 60%, improve ventilation or consider a compact dehumidifier.
Apply a breathable sealer to cementitious grout annually to limit absorption. In busy households, a five-minute weekly bath brush check of high-splash areas can be shared among family members. Focus on the areas around taps, niches and the lower metre of the shower, where biofilm returns most quickly. Little, regular abrasion beats rare, heroic cleans.
- Pros: Low cost, low fumes, precise control, kinder to finishes.
- Cons: Manual effort, takes practice, not a cure for failed grout or leaks.
- Why Chemicals Alone Aren’t Better: They brighten but rarely penetrate biofilm without agitation.
Understand the limits of the method. Black mould that continues beneath cracked or missing grout, or staining that “bleeds back” within days, can signal water ingress, failed sealant or damage below the surface. In these circumstances, it is time to call a professional. Regrouting or joint repairs may be needed, potentially after drying work and mould remediation. Likewise, avoid attempting DIY acid treatments on natural stone; a specialist can select compatible cleaning chemistry. The guiding principle is simple: if structure is compromised, scrubbing is a stopgap, not a solution.
The bath brush method may not look impressive, but it works through straightforward physics: friction disrupts biofilm, controlled strokes access narrow crevices, and mild chemistry removes what remains. Paired with disciplined ventilation and a weekly touch-up, it can keep grout bright without bleach fumes or costly gadgets. For many homes, this benefits health, household budgets and tile finishes alike. As you look at your bathroom this weekend, where will you begin your first ten-minute steady-scrub session - and which small change could turn it into a routine you will actually maintain?








Comments
No comments yet. Be the first to comment!
Leave a Comment