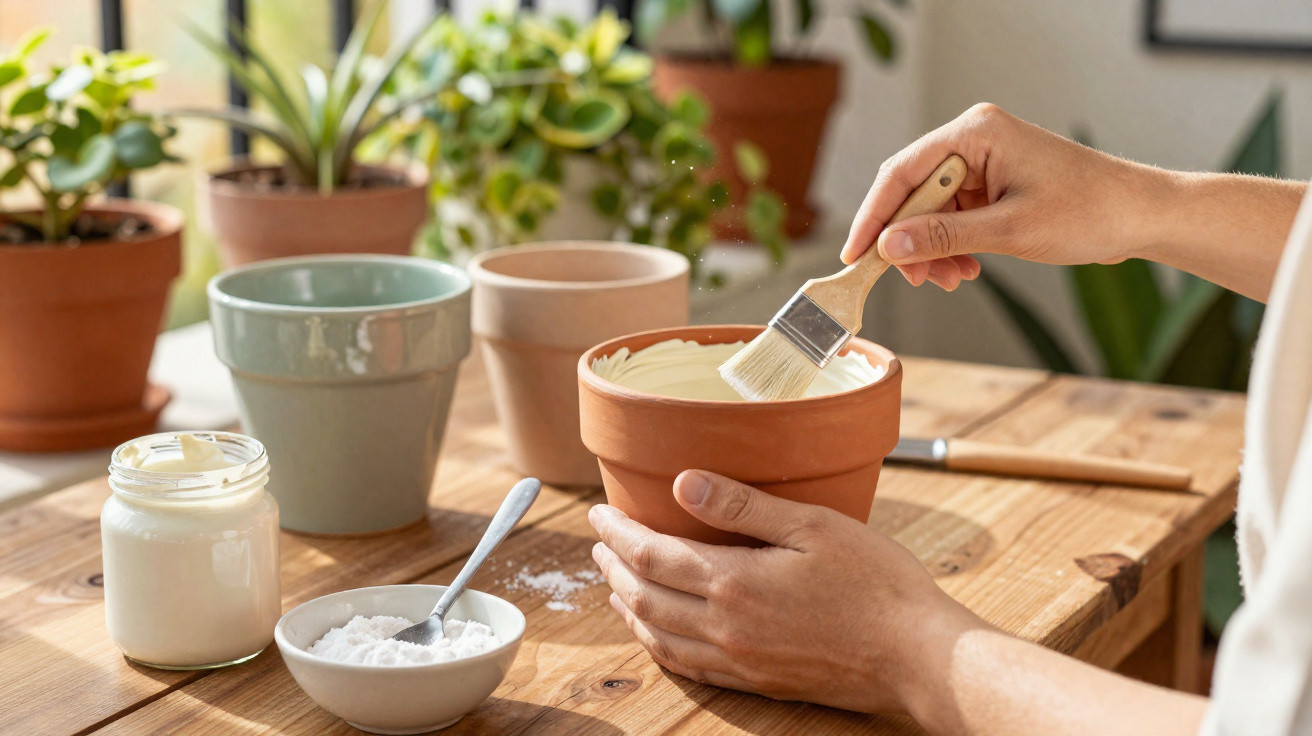
With one simple trick, you can give them the look of expensive ceramic vases.
The same algae-covered, dirty plant pots have stood on many balconies and patios for years. The desire for a fresh, contemporary appearance often clashes with the cost of buying new pots – or with instructions whose paint starts peeling again after a short time. Yet there is a surprisingly inexpensive way to turn plain terracotta pots into pieces that appear to be handmade ceramics.
Why ordinary paint so often fails on terracotta pots
Anyone who has simply “painted over” a terracotta pot will know the issue: it may look good at first, but after a few weeks outdoors, bubbles appear, the paint flakes away and unsightly marks show through again.
“The reason lies in terracotta’s microporosity: the clay breathes – and carries moisture from the inside to the outside.”
When watered, the pot wall absorbs moisture. This gradually travels outwards, dries at the surface and effectively pushes the paint layer away. That is precisely why many standard paints that work on wood or metal do not last long on terracotta.
The method now gaining popularity is based on professional craft techniques. The key is to keep water contained inside the pot, leave the outer clay surface stable, and combine this with a special blend of acrylic paint and bicarbonate of soda that closely resembles real ceramic.
Step 1: Clean and prepare the pots thoroughly
Before a brush goes anywhere near the pot, it needs proper cleaning. Cutting corners here risks the paint peeling later on, regardless of how good the product is.
Basic cleaning method
- Scrub the terracotta pot with a stiff brush and lukewarm water.
- Add a little white vinegar to the water to loosen algae, limescale and salt deposits.
- Rinse thoroughly and allow it to dry completely.
- Soak old, heavily soiled pots in water for 10–20 minutes, then brush them again.
While the pot dries, keep it out of direct sunlight, as this can quickly cause hairline cracks or staining. Finally, lightly roughen the surface with fine-grit sandpaper so that the primer adheres better.
Step 2: Seal the inside to stop moisture coming through
Perhaps the most important stage happens where it will barely be visible later: inside the pot. Careful work here prevents moisture from damaging the new finish again.
Suitable sealing products include, for example:
- clear boat varnish, or “marine varnish”, designed for wood and exterior use;
- or a liquid waterproof coating intended for cellar walls or foundations.
Apply either product thinly with a brush or small roller. One or two coats will usually be enough, but follow the manufacturer’s stated drying times. The inner coating acts as a barrier, preventing watering water from slowly moving through the clay to the outside.
Next, apply an acrylic primer for mineral surfaces to the exterior – if in doubt, a universal exterior adhesion primer will also do. This layer ensures the later paint mixture covers evenly rather than soaking in patchily.
Step 3: Make the “ceramic mixture” with paint and bicarbonate of soda
Now comes the stage that creates the look. Rather than using conventional gloss paint, choose a relatively thick exterior acrylic or vinyl paint. Mix in bicarbonate of soda, also known as sodium bicarbonate, which is often used at home as baking soda or a cleaning aid.
“The rule of thumb: 1 heaped tablespoon of bicarbonate of soda per 100 millilitres of paint – this creates the characteristic, slightly rough ceramic look.”
The bicarbonate of soda makes the paint look more matt, chalkier and lightly textured. Small dents or scratches in the clay become less noticeable. Terracotta shades, warm ochre, beige, greige or muted greens such as sage produce particularly homely results reminiscent of studio pottery.
Applying the paint mixture
Stir the mixture thoroughly until no lumps remain visible. Then it is time to start painting:
- Apply the first coat to the outside with a wide brush. Do not aim for perfection; slight brush marks are desirable.
- Leave it to dry for at least two hours.
- Add a second coat to even out the colour.
- For very pale shades or badly damaged pots, plan a third coat after around six hours.
Leave the inside of the pot unpainted, as the sealant is sufficient there. After the final coat, the surface needs around one to two days to dry fully.
The right colours and a protective varnish for outdoors
To retain the matt ceramic effect, finish with a matt clear acrylic varnish for exterior use. Two thin coats are generally enough to protect the paint from rain, UV radiation and dirt.
This step is especially worthwhile if the pot will remain outdoors all year round. The varnish also makes cleaning easier: a damp cloth or lukewarm water without aggressive cleaners is often all that is needed.
Good drainage at the bottom remains essential: keep the hole clear, and ideally place the pot on small feet or wedges so rainwater cannot collect underneath. Loose, well-draining compost mixes are also a good choice, helping both roots and the container stay healthy for longer.
What the trick costs – and everything you can transform
As well as its appearance, the method’s appeal clearly lies in the price. Many of the products can be used for several pots:
- Primer and acrylic paint will generally cover several containers.
- Bicarbonate of soda costs only a few pounds as a household staple.
- The sealant and clear varnish are applied in very thin layers.
When the material costs are worked out per pot, it is easy to come in below £10, and often well below that if you already have brushes and some of the products at home.
The technique is not only useful for traditional plant pots. It can also be used on:
- small herb pots for the kitchen windowsill;
- large planters on the patio;
- old saucers;
- decorative containers without plants, such as holders for lanterns.
If you wish, lightly sand individual areas after drying to create deliberate “vintage” effects, similar to those found on handmade ceramic pieces.
Practical tips on durability and care
Although the method is durable, a few measures can noticeably extend the lifespan of the refreshed pots:
- Avoid dramatic temperature changes, such as moving a pot from frost directly into blazing sunshine.
- Empty standing water from the saucer regularly.
- For winter, move sensitive pots as close as possible to the house wall or place them somewhere lightly sheltered.
- Touch up small blemishes generously using the same paint mixture, and they will not show.
With the correct preparation, the new look lasts considerably longer than simple craft projects made with leftover paint. In everyday use, it is usually enough to remove heavier dirt once a season with a soft sponge.
Why bicarbonate of soda works so well for a ceramic effect
Bicarbonate of soda is known as a food additive, cleaner and baking aid. When mixed into paint, it changes the texture: the mixture becomes thicker and dries to a subtly grainy, very matt surface. This is exactly the effect that recalls unglazed ceramics or expensive designer vases.
Those who like experimenting can adjust the graininess: a little more bicarbonate of soda gives a stronger texture, while less creates a finer finish. For smaller pots, a more restrained amount is usually advisable, so the proportions remain balanced and the pot does not look as though it has been heavily plastered.
More ideas for a personalised finish
Anyone not content with single-colour pots can expand on the basic technique. Possible options include:
- subtle colour transitions using a second, slightly lighter shade around the top edge;
- narrow hand-painted lines applied with a fine brush;
- tone-on-tone patterns, such as broad stripes or blocks of colour;
- a light “concrete look” created by mixing grey with a little white and beige.
On balconies and patios in particular, this makes it possible to create collections of pots that visually belong together without being completely identical – much like small handmade runs from a ceramics studio.
For anyone who likes the trend for natural materials and does not want to buy new decorative items every year, this method offers a sustainable option: existing pots remain in use, are given a more contemporary appearance and, thanks to sealing and protective varnish, last considerably longer than many cheap new pots made from thin plastic.





Comments
No comments yet. Be the first to comment!
Leave a Comment