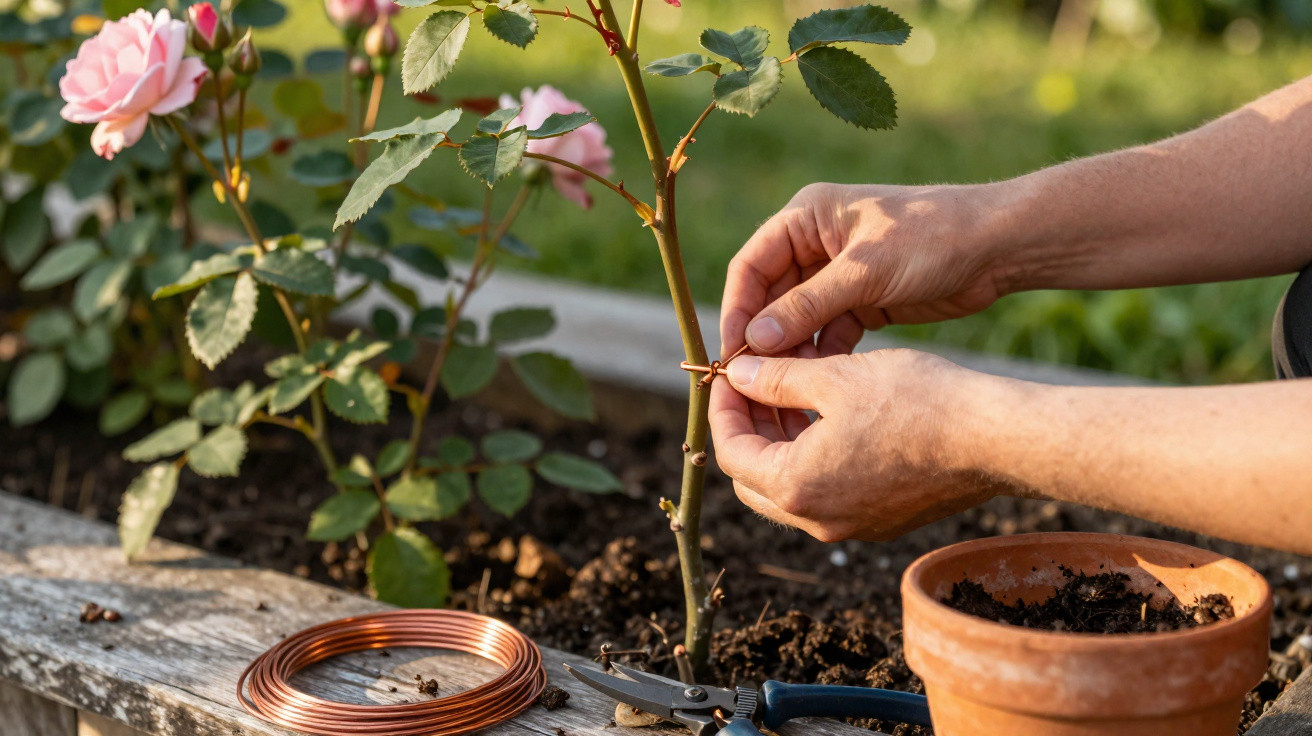
Many amateur gardeners cut out old, grey rose shoots drastically because they assume there is no life left in them. Yet many of these branches still contain enough vitality to grow an entirely new plant. A simple piece of wire can redirect the sap flow so that fresh roots form at precisely that point – without specialist tools or expensive professional equipment.
Why you should not cut off tired-looking rose branches too quickly
A rose branch may look grey, woody and almost lifeless, and the secateurs are already to hand. In many cases, however, it is too soon. As long as the wood has not dried out completely, sap is still moving inside it. This remaining energy can be used cleverly to turn a “problem branch” into a healthy new rose bush.
This is particularly valuable with old varieties that are now difficult to find in shops. Rather than cutting away the last usable shoot and regretting the loss, you can turn it into an independent plant. The underlying method is essentially known as layering, but here it works through the highly controlled use of wire.
“A thin wire only partially restricts the flow of sap. Hormones collect above the pressure point – and this is exactly where new roots develop.”
What happens inside the rose: sap channels and root stimulation
Every rose shoot contains two transport systems. The xylem carries water and nutrients upwards into the crown, while the phloem beneath the bark moves sugars and growth hormones – especially auxins – downwards. These auxins trigger root formation.
When soft wire measuring around 1 to 2 mm is secured tightly around the bark, the following takes place:
- The phloem is compressed, greatly slowing the downward return flow of hormones.
- The xylem remains largely functional, so water and minerals can continue travelling upwards.
- Auxins and other substances accumulate above the wire.
- Within three to six weeks, a visible root callus forms there – a swelling from which an independent root system will later develop.
There are two ideal times for this: very early in spring, when sap pressure increases, or towards the end of summer, when the plant is still active but no longer at peak performance. The rose responds most quickly during these periods.
Choosing the right rose shoot: neither too young nor too old
The branch you select is crucial. Shoots from the previous year are ideal: healthy, free from cracks and roughly the thickness of a pencil. Very thin, fresh shoots tend to dry out, while very old, heavily woody stems respond more slowly.
Position the wire around 15 centimetres from the base of the branch. Tighten it enough to create a clear indentation in the bark, but not enough to cut through it. The plant must continue to receive nourishment; only the return flow of hormones needs to be slowed.
What you actually need
The good news is that this technique does not require professional equipment. An ordinary home garden is perfectly sufficient. You will need:
- Soft wire (1–2 mm) or copper wire
- Flat-nose pliers for tightening the wire
- Sharp, disinfected secateurs
- A pot or small planting container with a saucer
- A mix of 50% loose compost-based potting medium and 50% washed sand
- A clear cover, such as a plastic bottle, polythene cover or small plant cloche
- A label with the date, so you can keep track of the timing
If you garden in a very damp or cool climate, copper wire is the better choice. Copper has a mildly antibacterial effect and may reduce the risk of rot at the pressure point.
Step by step: placing the wire in the right position
1. Select a suitable branch
Find a strong shoot from the previous year on a rose bush that is as healthy as possible. It should carry well-developed buds and show no signs of damage.
2. Apply and tighten the wire
Place the wire around 15 centimetres from the base of the branch. Wind it around once or twice, then tighten it with the pliers. The bark should be visibly indented but must not be severed. A slight “bulge” immediately above the wire over the following weeks is a positive sign.
3. Wait for three to six weeks
A callus should develop above the wire within three to six weeks. If the area feels firm and slightly swollen, a root base has formed. At this stage, you can decide whether to continue with the branch in the ground or in a pot.
Two routes to a new rose bush: in the ground or in a pot
Option A: Layering directly in garden soil
For gardens with a little space, the classic ground-layering method is suitable:
- Dig a small trench around 10 centimetres deep close to ground level.
- Add a bed of the sand-and-soil mix so the future roots can grow freely.
- Carefully bend the prepared branch downwards so that the wired section sits in the trench.
- Secure it with U-shaped wire or a peg to ensure the branch remains in contact with the soil.
- Cover it with soil and keep it moderately moist, avoiding waterlogging.
Many gardeners do not check progress until the following spring. Once sufficient fine roots have formed, use secateurs to separate the new plant between the parent bush and the rooted section, then plant it in its final position.
Option B: Rooting in a pot
Anyone without room for layering, or who wants greater control, can use the pot method:
- Cut the branch just below the wired section, ensuring that the entire callus remains with the new plant.
- Shorten the shoot to around 15 to 20 centimetres in length.
- Remove leaf remnants from the lower end and insert it into the sand-and-soil mixture to roughly two-thirds of its length.
- Water thoroughly, then keep it only lightly moist.
- Cover the pot with a clear bottle or cloche to create high humidity.
- Choose a semi-shaded position and avoid direct midday sun.
Two signs reveal whether it has worked: fresh growth at the tip and clear resistance when you pull the branch very gently. Roots have then developed, and the cover can be removed gradually.
When the young rose can be planted in the garden
Young plants produced in garden soil are usually separated in spring, once the ground is no longer frozen, or in early autumn while there is still time for growth. Before planting, loosen the soil thoroughly and, depending on its type, mix in a little compost or sand.
Potted roses with fresh roots should first be moved into a slightly larger container. Moving them into a flower bed is worthwhile only after the roots have filled that pot well. A sturdy support cane, inserted at a slight angle beside the plant, protects the young bush from wind damage.
How to avoid failures and improve your chances of success
This method produces surprisingly high success rates with old, non-grafted roses. A few basic rules will help:
- Never work during frost or in scorching heat.
- Do not keep moving the branch after applying the wire.
- Water whenever the soil dries out, but prevent puddles around the roots.
- Do not use fresh, extremely soft shoots, as they bend easily and dry out.
- Keep tools clean to prevent infections at the pressure point.
If you are unsure, try the technique on two or three shoots at the same time. At least one often succeeds, while giving you useful practice for future years.
Why copper wire can be a smart choice for roses
Many gardeners choose copper rather than ordinary iron wire. There are several reasons: copper remains flexible, rusts more slowly and releases trace substances that can make life harder for fungi and bacteria. At a deliberate pressure point, that is a small additional safeguard against rot.
Leave the wire in place initially, until the callus is firmly established and the new plant is well rooted either in the ground or in its pot. Only then should you remove it carefully or cut the shoot below the wired section.
More than a rescue method: propagating treasured old rose varieties
This technique is not only useful for rescuing struggling roses. If you have a special variety in the garden – perhaps a heritage plant or a favourite for its fragrance – you can use it to raise several genetically identical plants. Unlike plants grown from seed, the variety remains unchanged, with flower colour and scent staying exactly the same.
It becomes especially useful when redesigning beds. Over time, one ageing rose bush can become a small group of two, three or more identical shrubs. This gives borders a more harmonious appearance and allows particularly beautiful varieties to stand out more effectively.













Comments
No comments yet. Be the first to comment!
Leave a Comment