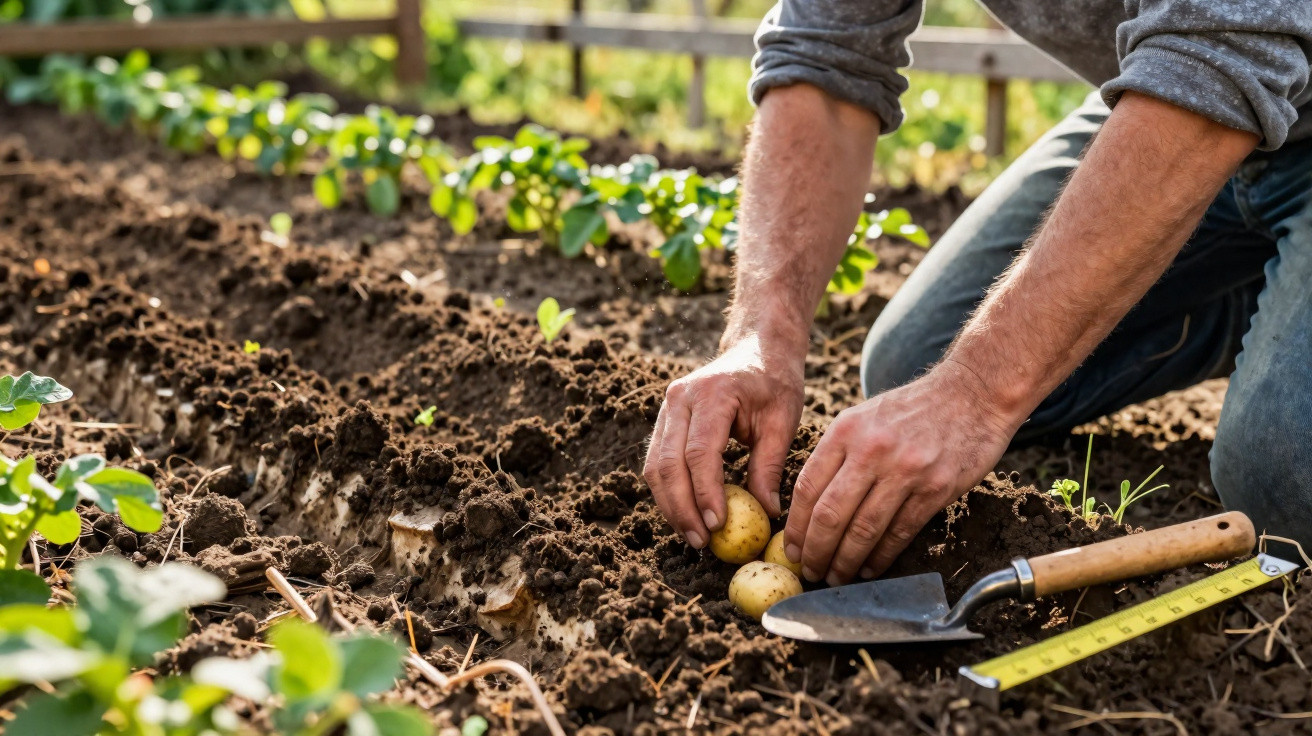
Many home gardeners focus on premium varieties or specialist fertilisers while overlooking a crucial, quieter factor: the correct planting depth. What happens beneath the soil determines whether tubers produce vigorous shoots, rot, or turn green and bitter. The good news is that a few straightforward rules can make a noticeable difference to what you harvest from your plot.
Why potato planting depth matters so much
A potato is essentially an energy store. The tuber contains sufficient energy to form roots, stems and new potatoes. How successfully this happens depends greatly on the layer of soil covering it.
The ideal depth keeps the tuber dark, cool and sufficiently moist, while still allowing its shoots to reach the light quickly.
When potatoes are planted too deeply, their young shoots take a long time to break through the surface and use up their reserves on the way. This weakens the plants, leaving them small and vulnerable. Planting too close to the surface creates different difficulties:
- Late frosts can strike the young shoots directly.
- Strong sunshine dries the soil out quickly.
- Developing potatoes may turn green and produce solanine.
Planting depth therefore has a direct effect on how quickly plants emerge, how resilient they are and, ultimately, the size of the crop.
The ideal zone: how deep to plant potatoes
Gardening guides and experienced home growers are remarkably consistent in recommending one clear range: tubers should be covered by around 10 to 15 centimetres of soil.
As a rule of thumb, plant potatoes so that there are 10–15 centimetres of soil between the top of the tuber and the soil surface.
In practical terms, this means:
- Loosen the bed thoroughly to a depth of 15–20 centimetres, removing stones and large clods.
- Place the potatoes in the furrow with the “eyes” or shoots facing upwards.
- Cover them with loose soil until each tuber has 10–15 centimetres of soil above it.
This depth delivers several benefits at once:
- The soil is a little warmer than it is at the immediate surface, so shoots get away more quickly.
- Temperature fluctuations are less extreme, helping plants cope better with cold snaps.
- Soil moisture remains more consistent without water sitting around for weeks.
Planting substantially deeper delays emergence and makes plants “use up” their reserves in the dark. Planting much shallower raises the chance of frost and drought damage, followed later by green potatoes.
Adjust potato planting depth for soil and climate
The 10–15 centimetre guideline is not a fixed figure. It is a range that should be adjusted slightly to suit the soil type, local climate and aftercare.
Heavy soils: plant a little shallower
Water can build up quickly in clay-rich, heavy ground, particularly in spring. Planting too deeply in these conditions can cause tubers to rot.
- Loosen the soil well before planting and break up large clumps.
- If needed, incorporate some sand or well-rotted compost to improve its structure.
- When in doubt, stay closer to 10 centimetres than 15 centimetres.
This gives the tubers adequate air and prevents them from sitting for days in cold, wet pockets. It helps reduce fungal disease and rot.
Light, sandy soils: increase the depth slightly
In sandy, highly free-draining soil, water quickly drains downwards. On warm days, the ground dries out rapidly.
In these conditions, it makes sense to use the upper end of the range:
- Aim for 10–15 centimetres, leaning towards 15 centimetres.
- Work in plenty of compost to retain water and nutrients.
- Mulch later with materials such as straw or grass clippings to stop the soil drying out.
The slightly greater depth creates a cooler area with more even moisture levels, which suits the tubers well.
Frost, drought and planting at the right time
The climate at your site also matters. In areas where frost arrives late, potatoes can be set a little deeper and then earthed up promptly. This gives both shoots and tubers greater protection.
In very dry locations, deeper planting alone achieves little. It should be combined with:
- A mulch layer after emergence to slow moisture loss.
- Targeted watering where necessary during extended dry periods.
- Avoiding planting too early, so that the hottest spell does not coincide with the vulnerable early stage.
Do not simply plant deeper to seek “cool moisture” – use mulch, soil care and earthing up instead.
Spacing, rows and earthing up: essential for a good potato crop
Even the best planting depth will do little if plants later crowd one another or the tubers are exposed to light. Three further factors matter: spacing, row layout and regular earthing up.
The right spacing for strong plants
| Parameter | Recommended value |
|---|---|
| Distance between tubers within a row | 30–40 cm |
| Distance between two rows | 60–75 cm |
| Soil covering the tuber at planting | 10–15 cm |
These distances give the plants sufficient room for foliage and roots. Nutrients and water can be used more effectively, while the tubers develop evenly instead of pushing against one another.
Why earthing up makes the difference
Anyone who simply plants potatoes and then forgets about them can easily lose a third of the potential harvest. Earthing up – sometimes referred to as hilling – is an often underestimated boost.
As soon as plants reach roughly 15–20 centimetres in height, draw soil in from both sides towards the stems. The base of each plant should then sit within a small ridge or mound.
Earthing up does more than protect plants: it creates additional “living space” in the soil, where extra tubers can form.
The benefits at a glance:
- New tubers remain in darkness and do not turn green.
- Plants are more stable in wind and rain.
- It is easier to hoe between rows and remove weeds.
- The raised ridge provides further points for tuber formation, increasing yield per plant.
This is usually repeated once or twice during the growing period, each time the plants have grown further.
Common planting-depth mistakes and how to avoid them
Many issues in a potato bed can be traced directly to planting depth and the care that follows. Three common pitfalls are:
- Planting far too deeply: shoots emerge late and plants remain weak, especially in cold springs.
- Planting quite shallowly without earthing up later: green, bitter potatoes and sunscald on the skins.
- Planting in wet, unworked soil: lack of air, rot and fungal infection, even where the depth is correct.
If you are unsure, mark one tuber in the first few rows and dig it up after two weeks. This makes it easy to see whether the shoots are struggling or are establishing strongly in the soil.
Practical examples for different types of garden
A suburban garden with heavy clay requires a different approach from a weekend plot on sandy ground. Here are two practical scenarios:
Example 1: Heavy soil in a cool location
Raised beds or slightly elevated ridges are worthwhile here. The potatoes then sit in loose soil that warms more easily, rather than in a cold clay basin. Keep planting depth closer to 10–12 centimetres, but earth up thoroughly once the plants have grown.
Example 2: Sandy soil in a very sunny location
In gardens like these, potatoes should be planted at around 13–15 centimetres deep. Compost and later mulching help retain moisture. Between the rows, you can deliberately leave low-growing undersown plants such as clover or phacelia, which shade the soil and protect it from erosion.
Understanding gardening terms and using them well
Those who are uncertain often come across terms such as “earthing up” and “mulching”. Here is what they mean:
- Earthing up: pulling soil from between the plant rows towards the stems. This creates small ridges around each potato plant.
- Mulching: covering the soil between plants with organic material such as straw, leaves or grass clippings. The layer prevents drying out and suppresses competing plants.
Combined with the appropriate depth, these two methods provide a double benefit: sturdy, healthy plants above ground and ideal conditions for the tubers below.
Once you have understood this straightforward technique – 10 to 15 centimetres of depth, well-loosened soil, correct spacing and consistent earthing up – you will notice the difference by harvest time at the latest. Instead of filling only a few bowls, you can fill whole crates with firm, healthy potatoes from your own garden.












Comments
No comments yet. Be the first to comment!
Leave a Comment