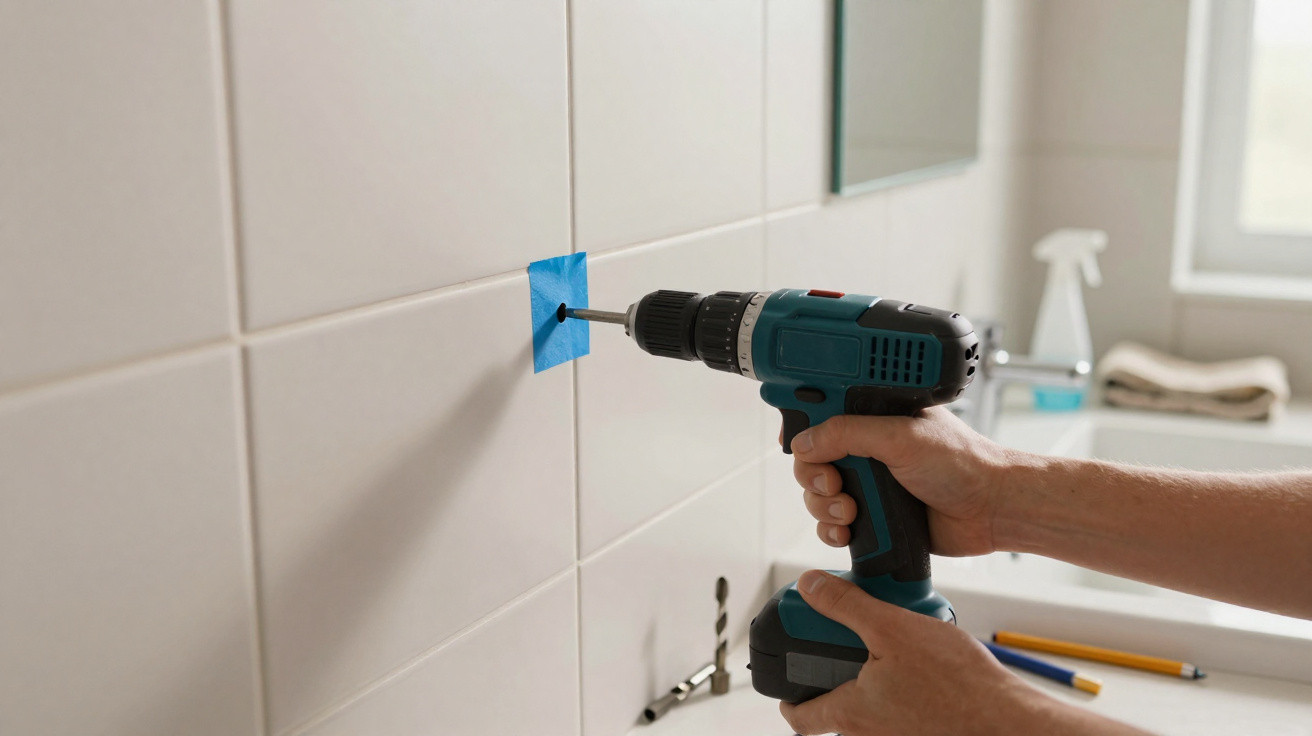
The sound is sharp, almost more violent than expected. The drill bit has barely touched the bathroom wall when the tile splits into a star-shaped crack, sometimes extending as far as the next grout line. You are left standing there, drill in hand, with the all-too-familiar feeling that a small shelf-fitting job has become an expensive repair project. We have all had that moment when we thought we were only putting in “two screws”. Yet in most cases, tiles do not crack through bad luck or necessarily because they are poor quality. One commonplace mistake in the first few seconds is enough to cause a clean chip. And it is often hidden behind a simple button on the drill.
Hammer mode: the habit that breaks tiles
When faced with a tiled wall, many DIYers pick up their drill and instinctively switch on hammer mode. It is the setting they use for concrete, brick or breeze block, so it seems like the obvious thing to do. But a tile is not a conventional masonry material: its glazed surface is hard, smooth and rigid, yet it handles repeated impacts very poorly. Hammer action produces a series of tiny blows that travel beneath the glaze. The tile may hold for a few seconds, then suddenly give way. The drill must never hammer against the tile.
Julien, who wanted to fit a towel rail in his flat, recalls hearing a “clack” almost as soon as he started. The hole initially looked neat, but a piece of wall tile the size of a two-euro coin fell away around the drill bit. His mistake was nothing dramatic: after drilling into a wall the previous day, he had left the selector on the hammer symbol. That small detail is often enough. With a thin wall tile, the crack may even remain subtle before widening as you tighten the screw or fit an oversized wall plug.
The trap is also that tiles offer genuine resistance at first. It is tempting to press harder, increase the speed or assume the drill is not powerful enough. In fact, you need to do almost the opposite. A suitable drill bit gradually removes material through abrasion or cutting, whereas hammer mode subjects the surface to sudden stress. Correct drilling feels slow, and can sometimes be frustrating, but it is vastly cheaper than replacing a tile. Let us be honest: nobody really does this every day, which is exactly why the wrong setting is so often used.
The simple technique that prevents cracks around the hole
Before drilling, make sure hammer mode is switched off and select a bit designed for tiles. For ceramic wall tiles or porcelain stoneware, a carbide-tipped bit may be enough; for very hard tiles, a diamond bit gives a cleaner result. Place a piece of masking tape in a cross over the area: it helps stop the bit slipping and makes the mark easier to see. Start at a low speed without excessive pressure, keeping the drill perfectly straight. The first millimetre is the most delicate stage.
Once you have gone through the tile layer, the wall behind it changes the rules. If you reach concrete or brick, you can then withdraw the bit slightly, switch to hammer mode and continue using a bit suited to that substrate. This change must happen only after the tile, never before. Many cracks also occur because people force the drill to save time, particularly when the bit gets hot. Take short breaks, allow it to cool, and lightly dampen it if the bit manufacturer permits this. A neat hole often comes down to a matter of seconds.
Where you drill matters just as much as the quality of the drill. Drilling into a grout line can sometimes work, provided it is wide enough and the fitting does not require substantial strength. Avoid tile edges, corners and areas already weakened by an existing crack. A tiler often sums up the rule like this:
“You do not beat tiles with force; you go through them with patience.”
- Rotation-only mode when the bit meets the tile;
- Low speed when starting;
- A dedicated tile or diamond drill bit;
- Light, steady pressure;
- Hammer mode only after passing through the tile covering.
An unbroken tile starts with two minutes of preparation
Before taking out the drill, spend time checking what is concealed behind the wall. In a kitchen or bathroom, a water pipe, electrical conduit or hollow partition can complicate the task far more than a simple chipped hole. A material detector offers some reassurance, even though it cannot replace checking plans or using common sense. Also inspect the installation: a tile that sounds hollow when tapped with your fingers is more vulnerable. In that situation, a gentle approach is not optional; it is the only sensible method.
The hole diameter also deserves a moment’s thought. Fitting a large wall plug into a small drilled hole forces you to widen it, bend the bit and sometimes chip away the glaze in the final few millimetres. It is better to measure the screw, wall plug and substrate before starting. For a lightweight fitting, drill-free alternatives are even available, such as high-strength adhesives or certain bonding systems. Naturally, they are not suitable for everything: a grab rail or wall-hung cabinet requires a dependable mechanical fixing. But for a small accessory, avoiding the hole can avoid the stress too.
What causes a tile to chip, then, is not necessarily a bad drill or a lack of skill. More often, it is an automatic response learnt from DIY on bare walls: engage hammer mode, push hard and try to get through quickly. A tile requires a different pace. It calls for slowing down at precisely the moment when you want to finish the job. Once that habit is established, fitting a mirror, shelf or toilet roll holder becomes far less daunting. And if someone close to you is about to drill with the hammer symbol selected, this small warning could save them an entire Saturday spent searching for the “same” tile.
| Key point | Detail | Benefit for the reader |
|---|---|---|
| Avoid hammer mode | Hammer action weakens the glaze and causes cracks. | Greatly reduces the risk of a chipped tile from the very first hole. |
| Use the right drill bit | Carbide or diamond bit, depending on tile hardness. | Enables more accurate, cleaner and less tiring drilling. |
| Slow down at the start | Low speed, light pressure and a perfectly straight drill. | Protects the glazed surface and makes fitting the fixture easier. |








Comments
No comments yet. Be the first to comment!
Leave a Comment