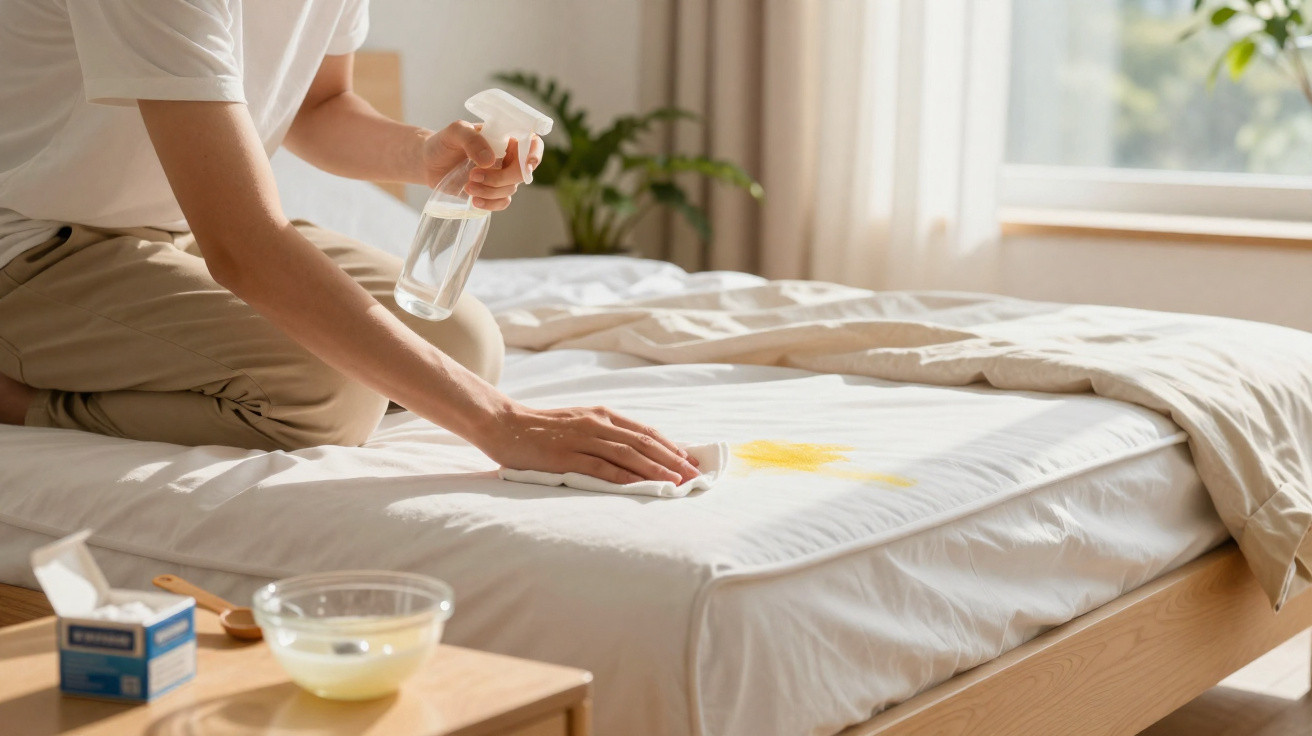
Fresh bedding makes a difference, but your mattress can still hold on to stains that only become obvious in the morning light.
Recently, home-cleaning forums have been buzzing about an easy way to deal with yellow patches spreading across mattresses. It relies on everyday cupboard basics, keeps the approach mild, and helps bring back a clean, neutral feel-without booking a cleaning service.
Why mattresses turn yellow
That yellow tint develops as sweat, skin oils and dead skin cells work their way into the top layers. Damp conditions accelerate the change and create a more welcoming environment for mites and bacteria. Limited airflow makes it worse, particularly in muggy bedrooms or where the bed sits tight against a wall.
Although bleach-based cleaners might seem tempting, they can be harsh on fibres and can discolour fabric. Many people say they get more consistent results from an inexpensive blend that cleans, neutralises smells and dries out without leaving the surface stiff.
This gentle approach targets sweat and body-oil oxidation, not just the surface tint. Aim for clean and dry, not stark white.
The three-ingredient mix
You don’t need specialist products-just common household items that work as a team to lift marks, reduce odours and refresh the outer layer of foam or ticking.
What you’ll use
- 1 cup (240 ml) 3% hydrogen peroxide
- 3 tablespoons baking soda
- 1 teaspoon mild liquid detergent
- 1 clean spray bottle, 2 microfiber cloths, 1 fan (optional)
Formula at a glance: 1 cup 3% hydrogen peroxide + 3 tbsp baking soda + 1 tsp mild detergent. Mix just before use.
Step-by-step method
- Combine the three ingredients in a spray bottle. Gently swirl rather than shaking to keep foaming to a minimum.
- Vacuum the mattress to lift dust and grit from the surface.
- Lightly mist the discoloured areas-avoid soaking the foam.
- Leave it for 10–15 minutes while it fizzes and breaks up the build-up.
- Wipe using small circular motions with a clean cloth. Rinse the cloth and repeat as needed.
- Go over the area with a barely damp cloth to remove any remaining residue.
- Let the mattress dry completely with windows open or a fan on a low setting. Don’t put bedding back on until it’s dry.
Newer marks usually fade quickly. Older yellowing may need a second treatment once the first has dried fully. Look for gradual improvement rather than expecting a single spray to fix everything.
Precautions before you start
Always do a spot test first. Pick a hidden edge or the underside of the cover, wait 20 minutes, then check for any colour shift. If there’s no change, continue with a light mist.
Be careful with the amount of liquid. Foam does not cope well with saturation. Excess moisture can lead to a stale smell or even mildew. Use short sprays, and bring the fan closer if the room feels humid.
Dry thoroughly. Moisture without airflow leads to odor and, in some cases, mold growth. No bedding back on until the core feels dry.
When to call a professional
If stains are deep and long-set, if you notice any mould, or if there’s a persistent odour even after thorough drying, it’s time to use a professional. Specialist cleaners use controlled steam or low-moisture extraction, along with antimicrobial products designed for foam and ticking. Many homes book this once a year, often as part of spring cleaning.
Keep a mattress clean longer
Smart weekly and seasonal habits
- Vacuum monthly using an upholstery tool, paying attention to seams to remove dust and mites.
- Fit a waterproof, breathable protector and wash it along with your sheets.
- Let the bed air out-open windows for a cross-breeze on dry days.
- Rotate or flip (if the model allows) every three months to distribute wear.
- Keep humidity in check. Aim for 40–50% relative humidity to reduce odours and slow microbial growth.
What not to try
- Don’t use chlorine bleach on ticking or foam. It may weaken fibres and cause patchy marks.
- Don’t use heavy steam on memory foam. Heat and moisture together can deform the foam structure.
- Don’t apply enzyme-heavy pet-stain cleaners to wool-blend covers. They may alter or misshape the fibres.
Why this gentle chemistry works
Hydrogen peroxide breaks down into water and oxygen while helping lift oxidised body oils responsible for the yellow tone. Baking soda helps buffer pH and absorb odours. A small amount of detergent cuts through greasy films that hold on to dust. Together, the three ingredients address the stain chemistry from multiple directions and typically leave less residue than many spray-and-leave cleaners.
| Stain type | First response | Notes |
|---|---|---|
| Fresh sweat | Peroxide mix, light mist | Usually fades in one pass if dried well |
| Old yellowing | Two light passes, dry between | Progressive lightening beats scrubbing |
| Spills (tea/coffee) | Blot first, then mix | Protein + tannin; avoid rubbing early |
| Urine accidents | Blot, enzyme cleaner, then mix | Enzymes break proteins; dry fully after |
| Mildew | Stop and call a pro | Foam can hold spores deep inside |
Material-by-material notes
Memory foam
Keep the mist as light as you can. Press a white towel onto the area to assess moisture-if the towel comes away wet, stop and dry the mattress before doing another pass.
Latex
Latex tends to resist dust mites better, but it can still show sweat staining. Prioritise airflow and avoid hot steam so the material keeps its spring.
Hybrid and innerspring
These generally dry faster because air moves around the coils. Even so, treat the top panel like foam and keep spraying to a minimum.
Extra tips and realistic caveats
Put prevention at the top of the list. A zippered protector stops sweat reaching the foam, makes washing simpler, and often pays for itself by postponing professional cleaning or replacement. If you sweat heavily at night, look for breathable protectors that use a polyurethane membrane rather than vinyl, as they tend to hold fewer odours.
Spills and accidents are inevitable. Keep a small kit near the laundry: travel-size peroxide, baking soda, a small bottle of detergent, a spray top, and two white cloths. Act within minutes, use as little liquid as possible, and get air circulating straight away. This helps limit yellowing and smell, and reduces the odds of needing a second pass later.


Comments
No comments yet. Be the first to comment!
Leave a Comment